It’s crazy to think that our final year has almost past, even crazier to see our characters (that were initially a result of a conversation over burgers) come to life. It’s been a great year in my opinion, I’ve loved the project since the beginning and consider myself extremely lucky to have been part of the team that saw it through. I think we’ve grown and matured significantly as artists over the past year, all taking on our own fair share of responsibilities and roles that resulted in the film being shown at the end of year show. Problems we’re easily fixed, doubts were addressed and reassured, countless hours of work were invested in the project and I’m so proud of what we were able to achieve in the time we had.
I got to specialise this year, focusing on rigging and animation. I’ve learnt so much as a result of being able to focus and delve into the areas that interest me the most. However, I wouldn’t have had the chance to do so if I wasn’t working with a team that made it possible for me to specialise and for that i’m incredibly grateful. In addition to learning a lot, specialising has opened up career opportunities for me that I hadn’t even considered being applicable for previously. I’m incredibly happy to say that, in a few months time i’ll be stepping into a role and contributing to the industry based in N.Ireland and I cant wait to see what awesome things I learn about as a result of it.
I’ve been lucky enough to contribute to multiple projects this year as well, some modelling bits and pieces and character rigging. I think they’re all looking awesome! I cant wait to see them on the big screen. It’s going to be sad to part ways with the people you’ve went through hell with for four years, but can say with confidence that their going on to do amazing things and i’m looking forward to seeing what they do in the future.
In terms of networking, the past year has been incredible. I got to speak to industry veterans from Bungie and Double Negative and some long term animation hero’s of mine such as Richard Lico which was such an invaluable experience in itself, not only did I learn where the industry was but more importantly where it’s going. On top of all this, the Jam media hosted Dingle animation festival gave me the chance to connect with studios and employers from Ireland such as BrownBag Films, Boulder media,Giant Animation and Jam where a few job opportunities presented themselves there to.
I would have liked to have spent a bit more time throughout the year learning more about scripting and tool development but i’m looking forward to delving into it in greater detail when I graduate as well as finishing my online rigging classes through Puppeteer lounge.
I wouldn’t trade the last four years for anything, I’ve met so many amazing people and learned so many cool things, I’m eagerly looking forward to what the future holds.
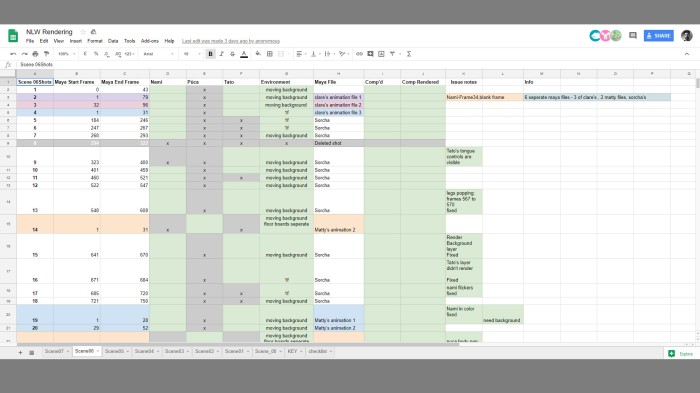
Similar to how we organised our animations to created a spreadsheet for rendering and compositing.
This was incredibly useful as it informed me what sequences had been rendered and prep’d for compositing, which meant I could go ahead and start working on it. Additionally, it was a great way for me to communicate to the rendering team if there’s were any rendering errors that needed redone before the comp was signed off after which I was immediately notified once the amendments had been made.
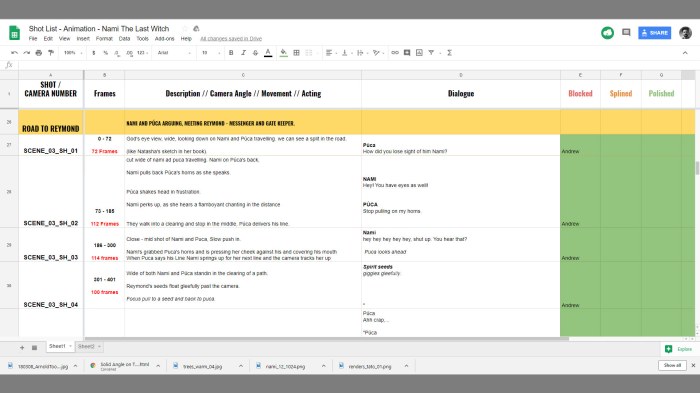
As opposed to jumping straight into animation, we sat together and organised all of the scenes and shots down to their frames and what the characters within the shot were doing.
This was incredibly helpful as it gave us a base to work off when setting up the camera sequencer, which we would be using to move from shot to shot.
Additionally, I was a great indicator of how far along we were in terms of animation.
This was incredibly useful when working on Reymond’s scene as any updates/adjustments for me to make were quickly added to the spreadsheet.
The term has been a lot of fun with a lot of hours and effort put in, but there’s still loads to do but the team are working flat out to ensure productivity is kept at a high level. All the feedback received up to this point has been constructive and greatly appreciated, as it’s helped shaped the project into what it is now and everyone seems to really love it. Personally, i’m happy to be given the opportunity to work in various different aspects of the project, from script writing and story to what I particularly enjoy, rigging (and soon animation). I’ve learnt a lot up to this point and am looking forward to learning more! Love my team, everyone’s super passionate and enthusiastic about the project, bringing their own skills and interests with them as they work. Looking forward to seeing what the next term brings.
However, researching further into the topic it became clear that a popular setup among artists within the industry was a facial rig system that used both joints and blend shapes. With this method you can get the core/primary facial poses using blend-shapes and then make refinements to the face using the joints.
I came across a facial rigging series from a TD – Rigger called Bjorn Blaabjergwho’s portfolio demonstrates a large variety of awesome looking character rigs.
The series covers the following:
Setting up the facial GUI
Sculpting Blendshapes
Connecting both Facial Controls and BlendShapes
Developing a joint driven lip setup
Squash and Stretch on the head
Fleshy Eyes
Lip Compression
Using wrap deformers to connect additional mesh objects to follow the face
As demonstrated above, this facial rig setup allows for a wide variety of expression and character to be added to our animation, it’s also suitable for lip syncing which is a must for our project.
With the model finished, I moved onto rigging Tato. Planning his skeleton was the first step as it would help lay the base foundations for the deformation systems to come. (See image below).
The areas marked in yellow indicate where I plan to implement the flexiplane modules to allow for exaggerated character poses. The flexiplane’s in the arms and the legs were ‘a must’ feature as it would allow our animators to achieve smear frames easily. However in the case of Tato’s body, their use would be more experimental. Based off the animatic, Tato’s only really needs to be able to bend and twist from his hips, chest and Head, so exaggerated body functions aren’t really needed and would be tricky to set up based on how limited his body mesh is. I’ll create a setup that enables the animator to turn the torso’s flexiplane functionality off and on.
Rig Hierarchy
In order to keep my scene clean to work off, I organised and planned out my outliner.
Rigging Tato’s Body
Tato’s Body/torso was quite basic, the pelvis and chest joints were bridged using a flexiplane. A similar approach was used for how the chest was connected to the head.
The setup for connecting the flexiplanes to the pelvis and torso was relatively straight forward.
First I created two control curves, one for the pelvis and one for the torso. If I froze the transforms on either control it would reset their orientations which would mean the controls orientation would differ from the orientation of the joint they were driving which could cause problems for the animator.
To get around this, I point and orient constrained a locator to the chest/pelvis joints with the maintain offset turned off causing it to snap to the respected joint as well as taking on its orientation. Now, If I parent the control curve under the locator and freeze its transforms the result is a control curve that has adopted the orientation of the locator/joint that has a zero’d out channel box. I then used a parent constraint to connect the joint to the controller.
Finally, I used a point constraint between the chest control curve and one of the flexiplanes control curves (in this case the upper control) to drive the translate of the flexiplane and used a straight connection between the rotation attributes of the of both controls to drive the rotation as I find that straight connections evaluate quicker and are less taxing on the scene than constraints. (This process was repeated when connecting the lower flexiplane control to the pelvis joint and chest to the head).
An additional feature added to the body rig was a ‘head-follow’ attribute where you can turn the parent relationship between the chest and head off and on depending on the animators preference or task set. This was a simple setup, both the chest control and head control are children of their own locator, the head locator is then parent constrained to the chest locator. the default result is now the head control will follow the chest control, however if the animator doesn’t want the head to follow the chest they can switch the weight of the parent constraint to ‘0’. Getting to the constraint weight is a bit messy for the animator, so I created a custom attribute that does it for the animator.
Rigging Tato’s Legs
Tato’s legs consisted of a 3 layered setup:
IK (Inverse kinematics)
FK (Forward Kinematics)
Bind ( With modular flexiplanes attached)
The thigh joints were aligned with the pelvis along the world Y and Z axis, this would help minimise the occurrences of buckling whenever the COG control is moved. The IK/FK joints were connected to the bind skeleton using orient constraints, (one batch of orient constraints for FK and one batch for IK) I decided to use orient constraints over a parent constraint setup as using the latter can sometimes cause skewing when the joint chain deforms as it’s trying to evaluate translation values on top of the joints rotational values.
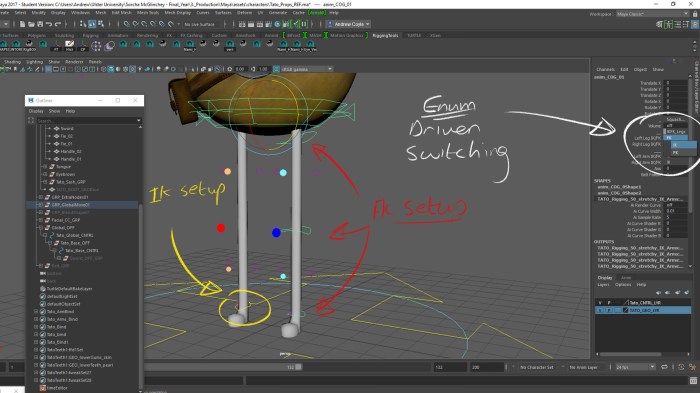
My typical process for setting up an IK/FK switch usually involves blend colour nodes and having the switching activated by ‘blend’ attribute on the blend colour. However this time I wanted to learn a different way of doing it.
I had the switching driven by the enum attributes (shown above) which were connected to the weight values of the orient constraints.
Example
Left Leg IK/FK
Enum: FK – connected to – FK Leg Orient Constraint Weight
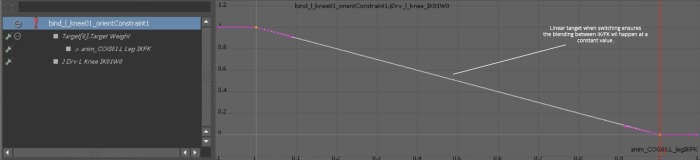
Then using Driven Keys (SDK) I set it up so that whenever the leg was in FK, the IK constraint weights would be switched to Zero with the FK constraint weights at One and vice versa. We wanted a ‘constant’ interpolation when switching so I quickly adjusted the enumerated value in the graph editor and changed its tangent to linear.
With the switching set up, I point constrained the foot joints to the end joint of my legs bind skeleton to ensure everything was working and behaving as it should.
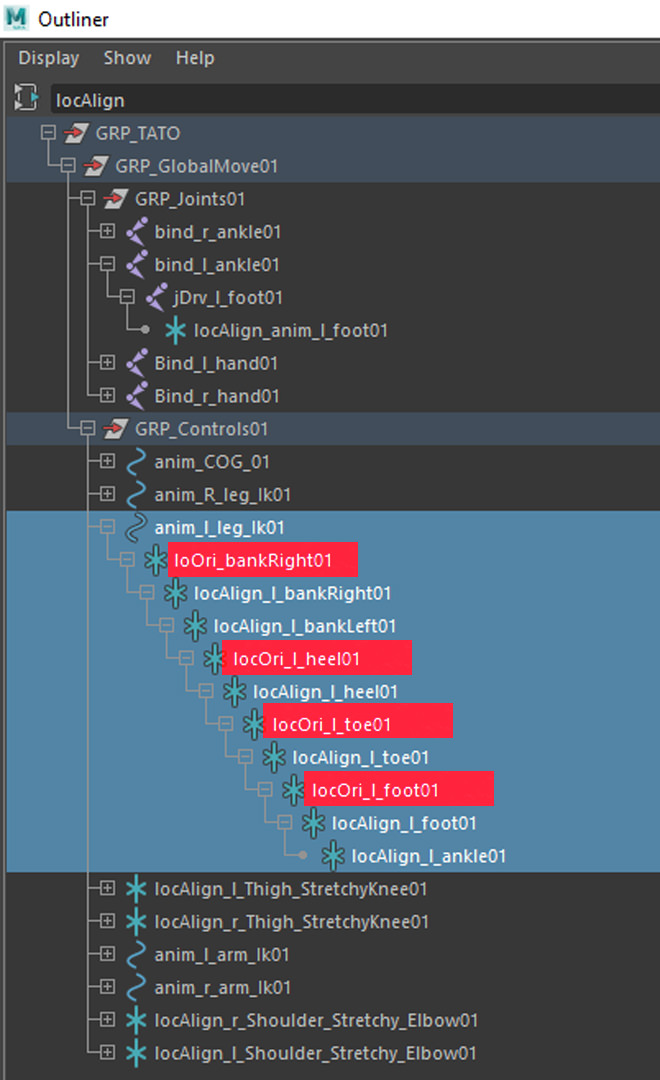
Setting up the foot roll rig involved having a series of purposely placed locators driving the foot joints movements based off the locators pivot rotations which the animator could then drive using a series of custom attributes such as foot banking, foot roll etc.
When setting up the foot roll, it became clear that several of the locators shared differing orientations from one another which meant when I started parenting locators to locators the result will give us an offset-ed value where we’d ideally like to have clean/zeroed values for our custom attributes to drive and to avoid gimbal.
To get around this, I parent constrained a locator to each joint (maintain offset turned off) making up the foot which cause said locator to snap to it’s corresponding joint, taking on its translate and rotate values, I identified these locators as ‘Ori locs.’
Now, when parenting locators to each-other that would result in outputting offsets, I instead would parent these locators under the corresponding ‘Ori loc’ which would give a clean and zero’d out result to work with.
This setup was particularly useful for the functioning of the foot bank, heel,foot and toe rotations.
Additionally the legs featured custom functions such as Knee twist with volume preservation, IK/FK stretching and Bend controls for the thighs,shins and knees.
Knee Twisting
The knee twisting took advantage of the Twist attribute that the legs IK Handle was being driven by. It was a case of creating a custom floating value attribute located the the legs IK control (called Twist) and using the connection editor to connect the two together.
IK Leg Stretch
For the IK stretch, I needed to work out the resting/default length of the leg and I found this out by point constraining two locators to follow the leg. One to the Thigh FK and one to the IK leg control, as constraining to the IK leg chains would cause cycle errors on the rig.
With the locators constrained correctly I used the node editor to input their translate values into the points 1 and 2 of a distance between node to calculate the space between them.
Then to get a uniform stretch, I plugged the output of the distance node into the a divide node, where the ‘change of length’will be divided by the ‘default/resting length‘ of the leg. Also, we need to remember to connect the scale of the global control into the legs stretch setup. I did this by taking the normalised value of the global controls scale attribute and plugging it into the input 2 of our divide node so we get an output value that’s divided by itself. Finally, I used a series of condition nodes to determine when the stretch would activate. If the default resting length was exceeded then the stretch would occur by scaling the scale X of the joint making up the leg.
The scale X attribute was also used to stretch the FK leg, where the increase or decrease of a custom attribute called length would scale the Joint inwards or outwards along that axis.
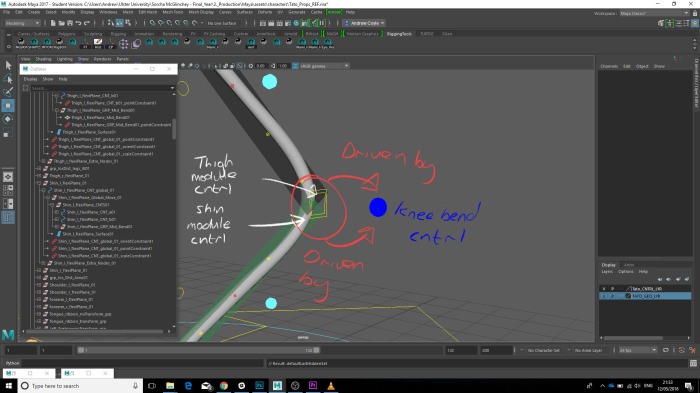
Bend Controls for the Thigh, shin and knee
Similar to how it was attached to the torso, the flexiplanes for the thigh and shin were constrained to their corresponding bind joints on the legs so they’d follow and behave as expected. However to get the knee bend function, we needed a control that followed the movement of the knee, even when it stretched and also had influence over the shin and thigh modules.
A locator was parented to the bind thigh joint which the knee control and it offset were children of. Then to ensure the control followed as the knee stretched its offset group was point constrained to the bind knee joint.
Rigging Tato’s Arms and Hands
The setup for Tato’s Arms was pretty much the same as the legs setup.
Features include:
IK/FK Switch
Stretchy IK/FK
Modular flexiplane components (upper arm, fore arm and elbow)
IK driven shoulder setup
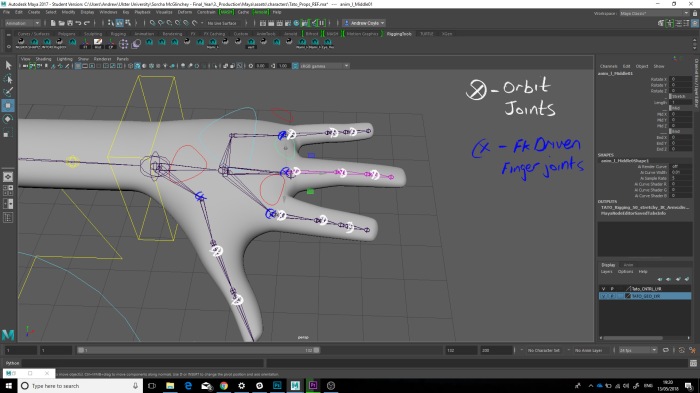
The hand setup featured and FK driven palm control to assist the animator with achieving more poses, in addition to FK figures with additional custom attributes that drive finger bending and deformations.
This was achieved through a technique called ‘orbit joints.’ Basically, for every area that the fingure bends we have two joints.
Fk Control driven Parent Joint
Custom attribute driven orbit child joint
The FK driven Joint allows the animator the pose the fingers in FK however they can use the Custom attribute driven Orbit joint to add a second layer of posing or animation on the hands if needed.
With the Torso, arms and legs setup, I decided to move onto the Facial rig setup.
Modelling Tato’s body was overall a straight forward process due to his simplistic design. However there we’re several things to keep in mind when creating his geometry.
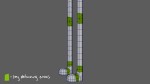
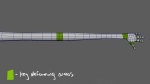
The character’s arms and legs would need a sufficient mesh density to allow for exaggerated deformations and smear frames.
The character’s body topology would have to be set up in such a away that would enable appealing body deformations as well as good facial poses.
I gathered up a library of references of topology from other rigs and models to see how they approached topology, in addition to coming across several useful tutorials that covered the modelling of several different appendages such as the hands and teeth etc.
For the arms and legs, I looked at the Max rig (by Peter Starostin and James Huntas) as reference for the arms and legs.
Max Arms and Legs
What I liked about the topology set up on Max was that the modeller has clearly communicated where the key deforming areas on the character are. They’ve achieved this by adding extra mesh resolution (edgeloops) where the deformations are going to be resonating from, highlighted using yellow in the images provided above. This in turn can be useful for the rigger as it communicates where initial joints should be place.
For the hands specifically, I also found this tutorial by Alex Cheparev very useful as he takes you through the hand modelling process from start to finish.
For Tato’s body, I found that iAnimates character rig Blurp to be an incredibly useful reference as the characters body set up would be similar to Tato’s.
Specially I used Victor Vinyals animation demonstration as a key reference source.
From this clip, I captured a still image to study and guesstimate the topology/edge-flow of the mouth in relation to the rest of the body.
As seen on the image above I’ve highlighted the poles the exist on the mesh, Normally i’d try to avoid the use of poles on a rigged character as when used improperly will result in pinching when the mesh is smoothed. However, it doesn’t seem to cause any unappealing artefacts when the character moves which gives me the impression that I may have I bit more wiggle room to work with when modelling Tato’s Body.
When it came to the modelling itself I worked off my references. As shown below, I’ve added more resolution to the mesh where the the character will be deforming, including the elbow,wrist and fingers. When it came to modelling the mouth I tried to replicate the topology found on the Blurp Rig, however I moved the poles a bit further out from the mouth to minimise on unappealing deformations or artefacts on the character mesh.
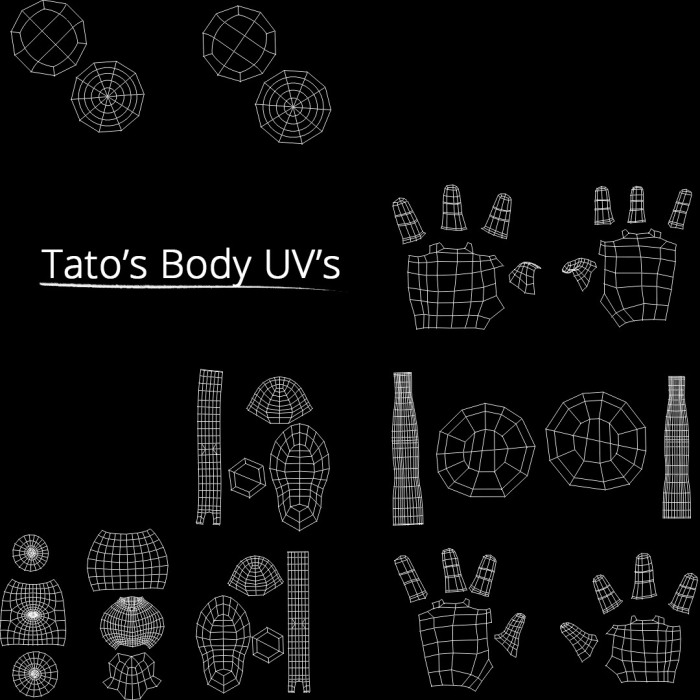
Tato’s UV’s
For Tato’s Uv layout, I tried to increase the amount of tiles use, so that a higher texture resolution could be achieved.
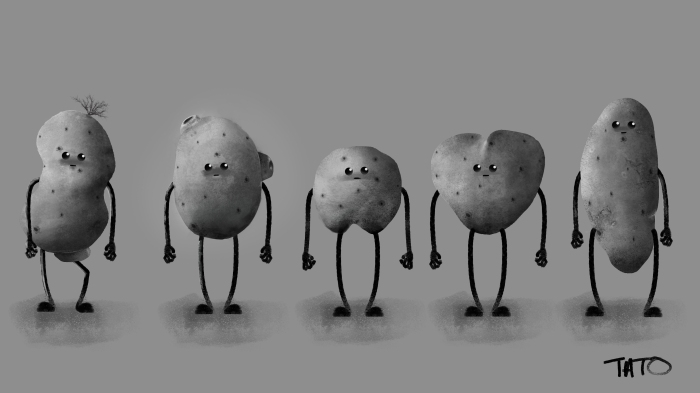
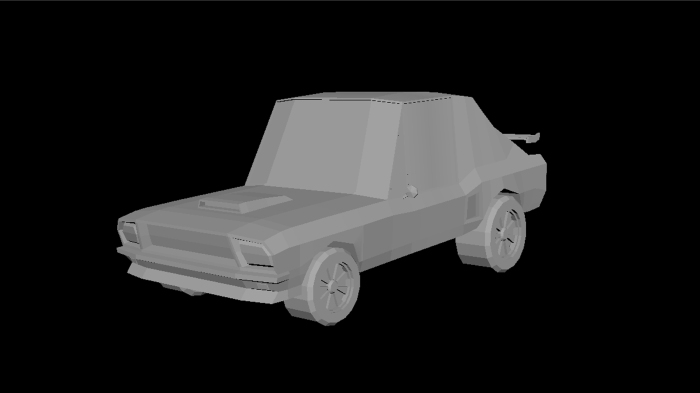
Below is a turntable of the finished model, ready to be rigged, and passed on for prop modelling and texturing.
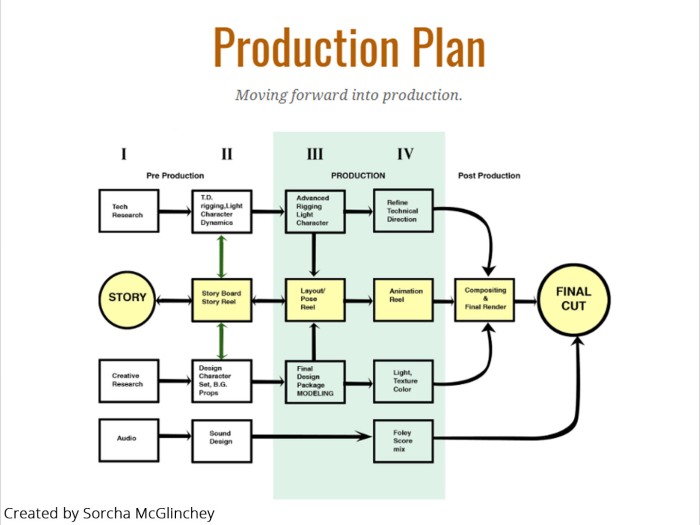
Sorcha put together this production plan to help us visualise what can be done at certain points as we progress through the project, for example, if character models are signed off and people are working on storyboards I can start the rigging process.
However, before jumping onto a rig I normally like to plan out the process into several stages. Which I picked up from Blizzard TD and Rigging artist, Carlo Sansonetti.
The stages are constructed as follows:
Communication
When the model is completed and passed onto the rigger for review, here the rigger reviews the mesh to ensure that it has an optimised mesh density and whether the geometry will allow for appealing character deformations for animation.
2. Skeletons
When the rigger inserts joints into the mesh, ensuring that they’re efficiently place to ensure the mesh will be able to deform in the correct way. Additionally reviewing concepts for orientation, naming conventions etc. Establishing the base foundations that the rest of the rig will be built on (very important)
3. Deformations
(The fun part) When the rigger uses the applications proprietary deformers to ensure that the visual quality of your character matches the design.
4. Controls
The implementation of the components that the animators are going to use move,pose and breath life into your characters. Good rig controls communicate to the animator how a rig functions.
5. Speed
Often the subject of debate between riggers and animators, its the riggers responsibility to find the balance between how the deformations look and how fast a rig is.
6. Communication
When the rigger completes a rig they need to pass it on to the animator, through this transition there will be a lot of communication between the rigger and the animator as the animator will provide a lot of feedback to the rigger based on what they need to do with the rig for certain shots.
Throughout the course of placement my main role was a Technical artist, where my responsibilities primarily revolved around rigging and animation (Key frame/mo-cap clean up) and as a result my interest in these areas have only grown.
Placement Reel
Although I’m interested in these areas and have some experience with them commercially there’s still a lot I want and need to learn for the sake of the project, in addition to benefiting my own reel.
Animation
Animation is something you’re not going to get better at unless you just sit down and practice, implement the 12 principles into the work and never underestimate the importance of references.
For learning resources I plan to refer to the works of:
Cartoon Character Animation In Maya – Kieth Osborn
How to cheat in Maya 2014: Tools and Techniques for character Animation – Kenny Roy
Rigging and Scripting
A great animation starts with a great rig which is why I want to really push the quality of the rigs I create throughout the course of the year. So far I’ve been approached by several other teams to help them out with the rigging process with regards to their projects. From the sounds of things i’m going to have the opportunity to create a wide variety rigs each with their own distinct styles and technical requirements. In addition to rigging I’ve come to realise the importance of scripting to maximise work productivity, which includes developing tools and scripts that make the job a bit easier for the artist.
For learning resources I plan to refer to the works of:
Delano Athias – Rigger, Technical Artist and Animator at Blur and Pluralsight
Josh Sobel – Character Rigger and Technical Director at Blue Sky Animation and Disney
Chad Morgan– Rigger and Technical Artist at Double Helix Games and Lecturer at University of Irvine.
Reading Resources:
Rig It Right – Tina O’Hailey
Compositing and Tracking
Finally, I hope to improve my skills in composting and tracking using primarily Foundry’s NUKE, Pixel Farm’s PFTRACK and Adobe After Effects. My interest in composting started in 2nd Year where I took a simple model of a rubik’s cube and composited into live footage using PFTrack to Maya and After Effects. As time has progressed I still enjoy tracking however I’ve been advised to learn NUKE for heavy compositing assignments due to it’s node based, non destructive workflow which we hope to implement into pipeline for the project.
For learning resources I plan to refer to the works of:
Being a generalist I plan to be involved in every stage of the pipeline from concept design all the way through to the final edit, however I hope to eventually become a full time technical artist/animator some day so focusing on developing my rigging/Technical and animation skills are what I hope to get the most out of for this project.
(as well as something our team is incredibly proud of)